Kindle Scribe OneNote Integration
OneNote is a powerful tool for collecting and organizing your thoughts, documents, and creative ideas. Though a bit outdated it’s still the go to platform for organizing notes for students around the world.
While Kindle Scribe is excellent e ink tablet for taking notes, if integrated properly with OneNote CAN offers additional features and versatility.
If you’re wondering how to integrate Kindle Scribe with OneNote seamlessly, you’re not alone. In this article, we’ll explore two simple methods to achieve this integration, allowing you to make the most of both platforms.
Why Integrate Kindle Scribe with OneNote?
When you share content from your Kindle Scribe, your handwritten or text sticky notes show at the end of the shared document. On-page mark-ups and highlights remain in the original doc.
The generated email contains a link that recipients can use to download the exported content within 7 days. Kindle Scribe doesn’t support sharing multiple notebooks at once.
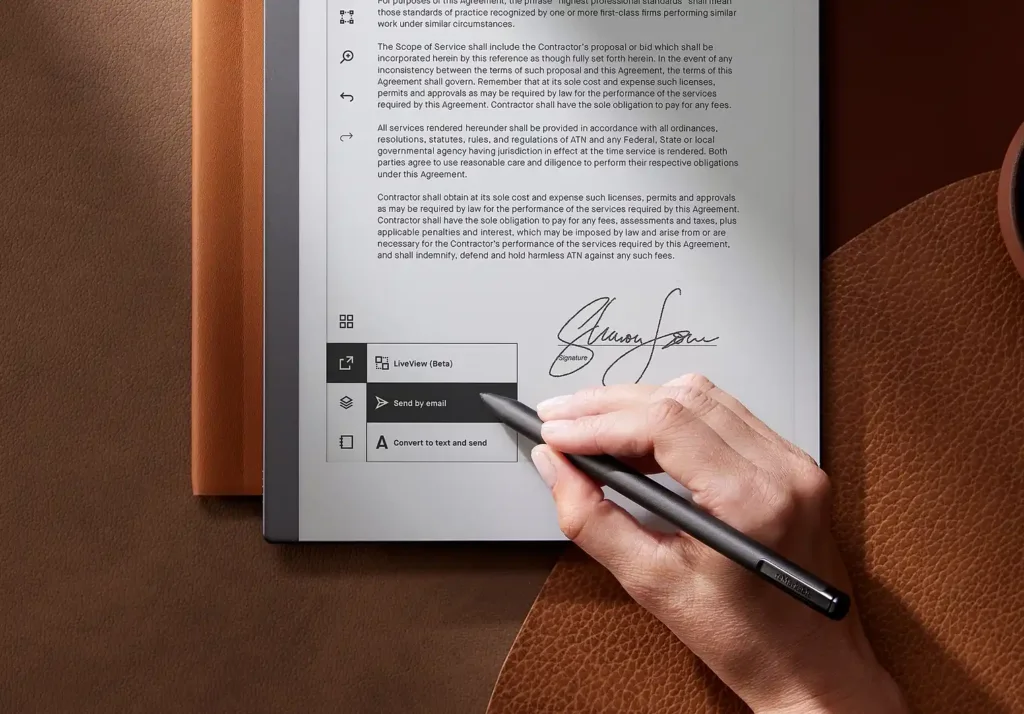
Note: The button only appears if you use “send to kindle” and add it to your library and then download the document on your scribe.
If you use “send to kindle” and send it directly to your device, it is impossible to export it.
- Open the book, document, or Notebook and tap to display the top bar menu. If in a book, tap the notebook icon.
- Tap the Share icon on the top-right corner.
- On the Share bottom menu, choose Quick send to [your registered email address] or Share via email.
Send Handwritten Notes as Text from Kindle Scribe
The converted notes can be send via email from your device and then you can upload those notes to your OneNote account.
- To access the Convert to text options in the Share menu:
- Go to the Notebook tab.
- Pick a downloaded notebook and select the More menu under the notebook’s thumbnail.
Select Share and choose one of these options:
- Convert to text and quick send [to your registered email].
- Convert to text and email. A preview window opens and you can edit the text by tapping on each page.
You can also access these options by tapping on the Share icon at the top of a notebook.
Related: Check Out these Free Kindle Scribe Templates
Forwarding Emails to OneNote using Outlook
This method involves using Outlook to forward emails containing your Kindle Scribe documents to your OneNote account. Here’s how to set it up:
- Ensure you have an Outlook Live account or an Office 365 account connected to your OneNote notebook.
- Access your OneNote account and create a section where you want to store forwarded documents.
- Set up your Outlook account to enable autoforwarding to OneNote. This way, when you email a document from your Kindle Scribe, it will be automatically sent to your chosen section in OneNote.
- Now, whenever you want to transfer a document from Kindle Scribe to OneNote, simply forward the document as an email to your Outlook account. It will automatically appear in your designated section in OneNote
Auto Forwarding with Outlook for Kindle Scribe
Auto forwarding will help streamline the overall process of getting you note in location. Follow the steps below:
- Open your Outlook client (e.g., Outlook 2013 or newer).
- Set up your email account and log in to the email server.
- Once your email account is set up, click on ”File” and select ”Manage Rules & Alerts.”
- In the ”Rules and Alerts” window, click on ”New Rule.”
- Choose ”Apply rule on messages I receive” and click ”Next.”
- Select conditions for the rule. You can set it to apply to emails from the Remarkable tablet.
- Click ”Next” and choose the action ”forward it to people or public group.”
- In the ”Rule Address” window, enter ”me@onenote.com” as the recipient and click ”Add.”
- Click ”Next,” then specify any exceptions (if required), and click ”Next” again.
- Name the rule, e.g., ”Auto Forward Remarkable Content,” and click ”Finish” to save the rule.
Conclusion
Integrating Kindle Scribe with OneNote opens up a world of possibilities for managing and expanding your creative ideas and notes. By using either of the two methods described in this article, you can seamlessly bridge the gap between these two powerful platforms.
Choose the method that suits your preferences and needs, and enjoy the benefits of having all your valuable content in one centralized location. Happy note-taking and creating!
Liked This? Find out more about reMarkable!
Check out these free templates for Kindle Scribe
Check out the in depth review of Kindle Scribe
Find Out which is the best E Ink Tablet